

Installing floor tiles is a long-term investment.
Whether you are renovating your home, building a commercial space, or upgrading a bathroom, the quality of the adhesive plays a major role in the final result.
Even premium ceramic or porcelain tiles can crack, become hollow, or lift from the floor if the wrong bonding material is used.
Many people still rely on traditional cement and sand mixtures because they appear affordable.
However, modern flooring installation has changed significantly.
Professional contractors now prefer specialized tile adhesives that provide stronger bonding, better flexibility, improved water resistance, and a longer service life.
This guide explains everything you need to know before selecting a floor tile adhesive.
From choosing the right product for different tile types to avoiding common installation mistakes, you will find practical advice that helps you achieve a durable and professional finish.
What Is Tile Adhesive for Floor Tiles and Why Is It Better Than Traditional Cement?
Tile adhesive is a specially engineered bonding material designed to fix tiles securely onto a prepared surface.
Unlike ordinary cement mortar, it contains carefully selected cement, graded sand, polymers, and performance-enhancing additives that improve adhesion and durability.
Modern floor tile adhesive creates a consistent bond that reduces the chances of loose or hollow tiles over time.
Key Benefits
- Stronger bonding than traditional cement mortar
- Better resistance to moisture
- Improved flexibility for minor structural movement
- Easier application with a notched trowel
- Reduced tile slippage during installation
- Suitable for both residential and commercial flooring
Professional installers often recommend cement-based tile adhesive because it delivers reliable performance while reducing material waste.
Tile Adhesive vs Cement
Feature | Tile Adhesive | Cement and Sand |
Bond Strength | Excellent | Moderate |
Water Resistance | High | Low |
Flexibility | Excellent | Very Limited |
Ease of Installation | Easy | Labor Intensive |
Material Thickness | Thin | Thick |
Long Term Performance | Excellent | Depends on workmanship |
For modern construction projects, tile adhesive has become the preferred choice because it offers greater consistency and minimizes installation failures.
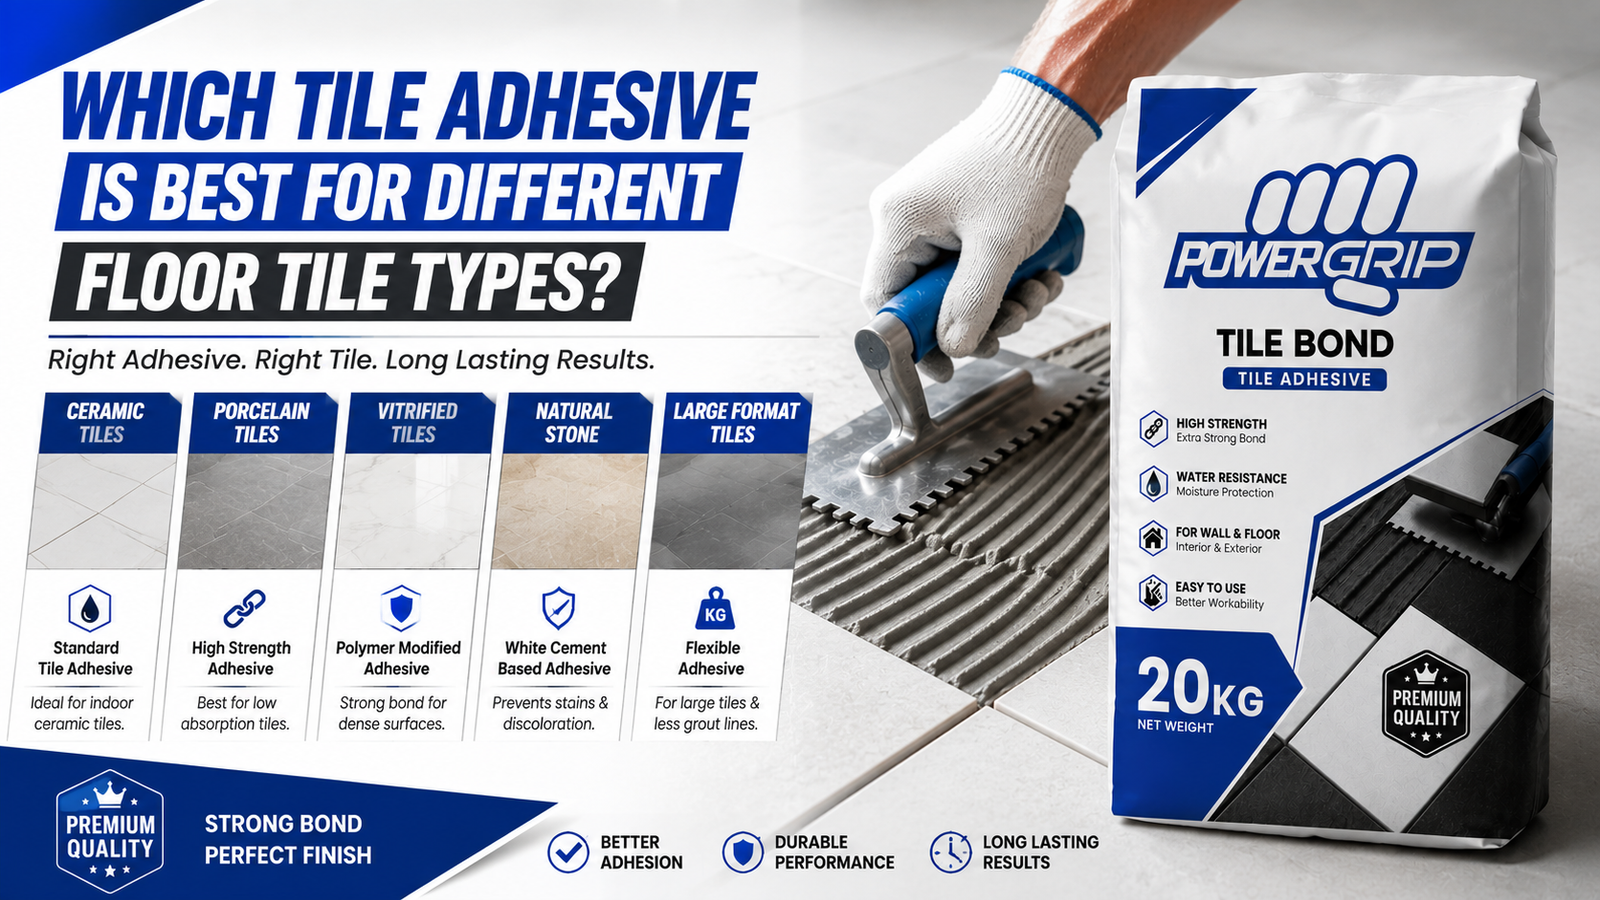
Which Tile Adhesive Is Best for Different Floor Tile Types?
Choosing the right adhesive depends on the tile material, tile size, and installation environment.
Ceramic Floor Tiles
A quality ceramic floor tile adhesive is suitable for kitchens, bedrooms, hallways, and living rooms. These tiles absorb more water than porcelain, making standard cementitious adhesives an effective option.
Best for:
- Living rooms
- Bedrooms
- Indoor residential flooring
- Offices
Porcelain Floor Tiles
Porcelain tiles have very low water absorption, making them denser and heavier.
For these tiles, professionals recommend a porcelain floor tile adhesive with polymer modification to improve bonding performance.
Ideal applications include:
- Shopping malls
- Commercial buildings
- Luxury homes
- High traffic areas
Vitrified Tiles
Vitrified tiles require high-performance bonding because of their extremely low porosity.
A polymer-modified tile adhesive provides better grip and helps prevent future tile lifting.
Marble and Granite Flooring
Natural stone flooring requires adhesives that can support heavier loads while minimizing movement.
Experts usually recommend:
- Flexible tile adhesive
- Heavy-duty floor tile adhesive
- Premium tile adhesive
These products help maintain long-term structural stability.
How Do You Choose the Best Adhesive for Your Flooring Project?
Many homeowners simply purchase the least expensive product available.
Unfortunately, this often leads to expensive repairs within a few years.
Instead, evaluate these important factors before buying.
Tile Size
Large-format tiles place greater stress on the adhesive.
Use:
- High-strength tile adhesive
- Flexible cement adhesive
- Thin-set tile adhesive designed for large tiles
Installation Location
Different spaces require different performance levels.
Interior Floor Installation
For bedrooms and living areas, an interior floor tile adhesive usually provides sufficient performance.
Exterior Floor Installation
Outdoor surfaces experience temperature changes, rain, and expansion.
Choose an exterior floor tile adhesive that offers:
- Weather resistance
- Strong bonding
- Crack resistance
- Moisture protection
Moisture Exposure
Bathrooms, balconies, kitchens, and laundry rooms require a waterproof tile adhesive to reduce moisture-related failures.
Using ordinary mortar in wet environments increases the risk of loose tiles and mold growth beneath the flooring.
Traffic Load
High traffic environments such as hospitals, schools, airports, and commercial buildings require heavy-duty floor tile adhesive capable of handling constant foot traffic.
Can Tile Adhesive Be Used for Every Type of Floor?
In most cases, yes. However, selecting the correct adhesive for the surface is equally important.
Common installation surfaces include:
- Concrete floor
- Cement screed
- Existing tile flooring
- Self-leveling compounds
- Stone substrates
Before applying adhesive, always ensure the surface is:
- Clean
- Dry
- Dust free
- Structurally sound
- Properly leveled
Uneven surfaces increase adhesive consumption and may lead to hollow-sounding tiles after installation.
Professional Tip
Use a floor leveling system together with tile spacers during installation.
This creates even grout joints and minimizes tile lippage, especially when installing large-format porcelain tiles.
What Types of Tile Adhesive Are Available?
Different projects require different adhesive technologies.
Cementitious Tile Adhesive
This is the most widely used adhesive for residential and commercial flooring.
Advantages include:
- Affordable
- Easy to mix
- Strong bonding
- Suitable for ceramic and porcelain tiles
Polymer Modified Tile Adhesive
Additional polymers improve flexibility and adhesion.
Ideal for:
- Large format tiles
- Heated floors
- Exterior flooring
- Commercial installations
Ready Mix Tile Adhesive
Ready mix products are supplied in buckets and require no mixing.
Best suited for:
- Wall tiles
- Small repair jobs
- DIY applications
For heavy floor tiles, cement based products generally provide superior strength.
Thin Set Tile Adhesive
Thin set mortar is one of the most widely recommended products by professional installers.
It offers:
- Excellent bonding
- Lower material consumption
- Consistent coverage
- Better long term durability
What Do C1 and C2 Tile Adhesives Mean?
When comparing products, you may notice ratings such as C1 tile adhesive and C2 tile adhesive.
These classifications indicate the adhesive’s performance level.
- C1 Tile Adhesive: Suitable for standard indoor ceramic tile applications with normal bonding requirements.
- C2 Tile Adhesive: Offers enhanced adhesion, making it ideal for porcelain tiles, vitrified tiles, large format flooring, and demanding environments.
For most modern homes, contractors increasingly recommend C2 adhesives because they provide stronger bonding, greater flexibility, and improved durability over time.
What Is the Correct Way to Apply Floor Tile Adhesive?
Even the best adhesive cannot compensate for poor installation.
Proper application is essential for achieving a durable floor that remains stable for years.
Step 1: Prepare the Surface
Before applying any adhesive, inspect the floor carefully.
The surface should be:
- Clean and free from dust
- Dry without standing water
- Flat and level
- Free from grease, oil, or paint
- Structurally sound
If the floor has uneven areas, repair them before tiling. Applying adhesive over an uneven surface often leads to hollow floor tiles and cracked grout.
Step 2: Mix the Adhesive Properly
Most cementitious tile adhesive products require mixing with clean water.
For best results:
- Follow the manufacturer’s water ratio.
- Mix using a mechanical mixer.
- Allow the mixture to rest for 3 to 5 minutes.
- Remix briefly before use.
Avoid adding extra water after the adhesive begins to set, as this weakens the bond.
Step 3: Spread the Adhesive
Use a notched trowel to spread the adhesive evenly.
The notches create uniform ridges that improve contact between the adhesive and the tile.
Choose the notch size according to the tile dimensions.
Tile Size | Recommended Trowel |
Up to 300 × 300 mm | 6 mm |
300 × 600 mm | 8 mm |
600 × 600 mm | 10 mm |
Large Format Tiles | 12 mm or larger |
Step 4: Back Butter Large Tiles
For large porcelain, vitrified, or natural stone tiles, apply a thin layer of adhesive to the back of the tile in addition to the floor.
This technique increases contact coverage and significantly reduces the risk of hollow spots.
Step 5: Install and Level
Press each tile firmly into the adhesive using slight twisting pressure.
Use:
- Tile spacers
- Floor leveling system
- Rubber mallet
These tools help create uniform grout joints and prevent uneven tile edges.
Step 6: Allow Proper Drying Time
Do not walk on newly installed tiles immediately.
Typical drying times are:
- Light foot traffic: 24 hours
- Grouting: 24–48 hours
- Heavy traffic: 72 hours or as recommended by the manufacturer
Cool temperatures and high humidity may extend curing time.
How Much Floor Tile Adhesive Do You Need?
One of the most common questions from homeowners is how much adhesive to purchase.
The answer depends on several factors, including:
- Tile size
- Floor condition
- Adhesive thickness
- Trowel notch size
- Installer technique
Average Coverage Per 20 kg Bag
Tile Size | Approximate Coverage |
Small ceramic tiles | 7–8 m² |
Medium floor tiles | 5–6 m² |
Large porcelain tiles | 4–5 m² |
Uneven floor surfaces | 3–4 m² |
Buying one extra bag is often a smart decision. It helps avoid delays if additional material is needed.
Which Adhesive Works Best for Different Areas of a Building?
Different environments place different demands on the adhesive.
Bathrooms
Bathrooms require:
- Waterproof tile adhesive
- Flexible tile adhesive
- Mold-resistant grout
These products help protect the installation from constant moisture.
Kitchens
A tile adhesive for kitchen floor tiles should resist:
- Water spills
- Cleaning chemicals
- Heavy appliances
- Daily foot traffic
A polymer modified adhesive is usually the preferred option.
Living Rooms
For living room flooring, a premium floor tile installation adhesive provides long-term durability and supports decorative large-format tiles.
Commercial Buildings
Shopping malls, schools, hospitals, hotels, and offices experience continuous foot traffic.
For these locations, contractors typically select:
- Heavy-duty floor tile adhesive
- High-strength tile adhesive
- Professional tile adhesive
- C2 tile adhesive
These products are designed to withstand demanding conditions while maintaining a secure bond.
Why Do Floor Tiles Become Loose, Hollow, or Cracked?
Many flooring failures occur because of installation errors rather than poor-quality tiles.
Common Causes
- Incorrect adhesive selection
- Insufficient adhesive coverage
- Uneven concrete floor
- Dust or dirt beneath the adhesive
- No expansion joints
- Walking on tiles before curing
- Incorrect mixing ratio
These issues often result in:
- Loose floor tiles
- Hollow floor tiles
- Cracked floor tiles
- Tile lifting from floor
How Can You Prevent Floor Tile Cracking?
Professional installers follow several best practices to minimize failures.
Expert Recommendations
- Choose the correct adhesive for the tile type.
- Prepare the substrate carefully.
- Use the correct notched trowel.
- Achieve at least 90–95% adhesive coverage.
- Leave movement joints where required.
- Use quality grout after proper curing.
- Avoid rushing the installation process.
These steps create a strong floor tile bond that lasts for many years.
Is Tile Adhesive Better Than Cement?
For most modern flooring projects, the answer is yes.
Comparison
Feature | Tile Adhesive | Traditional Cement Mortar |
Bond Strength | Excellent | Moderate |
Flexibility | High | Low |
Water Resistance | Better | Limited |
Material Waste | Low | Higher |
Installation Speed | Faster | Slower |
Large Format Tiles | Excellent | Less Suitable |
Professional Finish | Superior | Depends on workmanship |
While cement mortar may still be used in some basic applications, professional contractors increasingly rely on floor tile bonding adhesive because it delivers more consistent results, reduces the risk of tile failure, and improves overall installation quality.
Which Features Should You Look for in a Premium Tile Adhesive?
Not all adhesives perform the same. A high-quality product offers more than just strong bonding.
Look for features such as:
- High initial grab
- Flexible formulation
- Waterproof performance
- Excellent workability
- Low shrinkage
- Crack resistance
- Long open time
- Easy mixing
- Strong adhesion to concrete and screed
- Compatibility with ceramic, porcelain, vitrified, marble, and granite flooring
Choosing a premium tile adhesive may cost slightly more upfront, but it can significantly reduce maintenance and repair expenses over the life of the floor.
What Are the Best Practices Recommended by Professional Tile Installers?
Experienced contractors follow proven methods to ensure a durable and attractive flooring installation.
These practices help reduce callbacks and extend the life of the floor.
Before Installation
- Inspect the concrete floor or screed for cracks and uneven areas.
- Remove dust, oil, grease, and loose particles.
- Repair damaged surfaces before tiling.
- Measure the area accurately to estimate adhesive requirements.
- Choose the correct adhesive based on the tile type and location.
During Installation
- Mix the adhesive according to the manufacturer’s instructions.
- Use the appropriate notched trowel size.
- Spread only as much adhesive as can be covered within the open time.
- Use tile spacers for consistent grout joints.
- Back butter large-format tiles for better coverage.
- Check tile alignment regularly with a level.
After Installation
- Allow sufficient curing time before walking on the floor.
- Apply quality grout after the adhesive has cured.
- Clean grout haze promptly.
- Avoid heavy loads until the floor reaches full strength.
Following these steps improves the durability of the flooring installation and reduces future maintenance.
How Do You Choose the Right Tile Adhesive Supplier?
The quality of the product is just as important as the installation technique.
When comparing brands or suppliers, consider more than the price.
A Reliable Supplier Should Offer
- Certified construction chemicals
- Clear product specifications
- Technical support
- Consistent product quality
- Availability across different cities
- Warranty or quality assurance
- Products suitable for residential and commercial projects
Contractors often build long-term relationships with trusted manufacturers because consistent quality leads to better project outcomes.
What Affects Floor Tile Adhesive Price in Pakistan?
Many buyers search for the floor tile adhesive price in Pakistan, but prices vary depending on several factors.
These include:
- Product grade
- Brand reputation
- Polymer content
- C1 or C2 classification
- Bag weight
- Bulk purchase quantity
- Dealer location
Instead of choosing the cheapest option, compare performance, coverage per bag, and long-term durability.
A slightly higher-quality adhesive often provides better value by reducing the likelihood of repairs.
What Are the Most Common Floor Tile Installation Mistakes?
Even experienced installers can make errors if they rush the job or skip important steps.
Mistakes to Avoid
❌ Using ordinary cement instead of the recommended adhesive
❌ Applying adhesive to a dusty or wet surface
❌ Mixing too much adhesive at one time
❌ Using the wrong trowel notch size
❌ Failing to achieve full adhesive coverage
❌ Ignoring expansion joints
❌ Walking on newly installed tiles too early
❌ Choosing the wrong adhesive for porcelain or vitrified tiles
Avoiding these mistakes helps prevent:
- Tile lifting
- Hollow sounds
- Cracked grout
- Loose tiles
- Water damage
- Costly repairs
Which Questions Do Professionals Ask Before Choosing an Adhesive?
Before selecting a product, experienced installers usually answer the following questions:
- Is the flooring indoors or outdoors?
- Is the tile ceramic, porcelain, vitrified, marble, or granite?
- Will the floor be exposed to moisture?
- Is the project residential or commercial?
- What is the tile size?
- Does the floor have underfloor heating or structural movement?
- Is a waterproof or flexible adhesive required?
Answering these questions makes it easier to choose the most suitable product for the project.
Frequently Asked Questions
What is the best tile adhesive for floor tiles?
The best adhesive depends on the tile material and installation area.
For porcelain, vitrified, and large-format tiles, a polymer-modified C2 adhesive is generally recommended because it provides excellent bonding strength, flexibility, and durability.
Can tile adhesive be used for floor tiles?
Yes. Modern tile adhesives are specifically designed for floor installations and provide stronger adhesion, better water resistance, and improved performance compared to traditional cement mortar when used correctly.
How much tile adhesive do I need for floor tiles?
Coverage depends on tile size, substrate condition, and trowel notch size.
On average, a 20 kg bag covers approximately 4 to 8 square meters under normal installation conditions.
How long does floor tile adhesive take to dry?
Most cement-based adhesives allow light foot traffic after about 24 hours. Grouting is usually completed within 24 to 48 hours, while full curing may take several days depending on temperature, humidity, and product specifications.
Can floor tile adhesive be used outdoors?
Yes. Exterior installations require an adhesive formulated for outdoor conditions.
Flexible, waterproof, and polymer-modified products are the preferred choice because they can withstand weather changes, moisture, and temperature fluctuations.
Conclusion
Selecting the right tile adhesive for floor tiles is one of the most important decisions in any flooring project.
A quality adhesive provides strong bonding, improves durability, resists moisture, and helps prevent common issues such as loose, hollow, or cracked tiles.
Whether you are installing ceramic, porcelain, vitrified, marble, or granite flooring, always choose an adhesive that matches the tile type, installation environment, and expected traffic load.
Proper surface preparation, correct application techniques, and adequate curing time are equally important for achieving professional results.
Investing in the right product today can save significant time, money, and maintenance costs in the future.
By following the expert recommendations in this guide, you can create a floor that remains strong, attractive, and reliable for many years.