

Installing tiles may seem simple, but the quality of the finished surface depends largely on how well the tile adhesive is applied.
Even premium ceramic or porcelain tiles can crack, become hollow, or detach if the adhesive is mixed or spread incorrectly.
That’s why learning how to apply tile bond the right way is essential, whether you’re working on a bathroom renovation, kitchen backsplash, outdoor patio, or a new flooring project.
Modern tile adhesive offers stronger bond strength, better flexibility, and improved durability than traditional cement mortar.
However, achieving professional results requires more than simply spreading adhesive on the floor.
Proper surface preparation, the correct tile adhesive consistency, the right notched trowel, and accurate tile placement all contribute to a long-lasting installation.
This comprehensive guide explains every stage of the tile bonding process—from choosing the right adhesive and preparing the substrate to mixing, applying, leveling, grouting, and curing.
Whether you’re a DIY homeowner or an experienced installer, these practical techniques will help you achieve a flawless tile finish while avoiding costly mistakes.
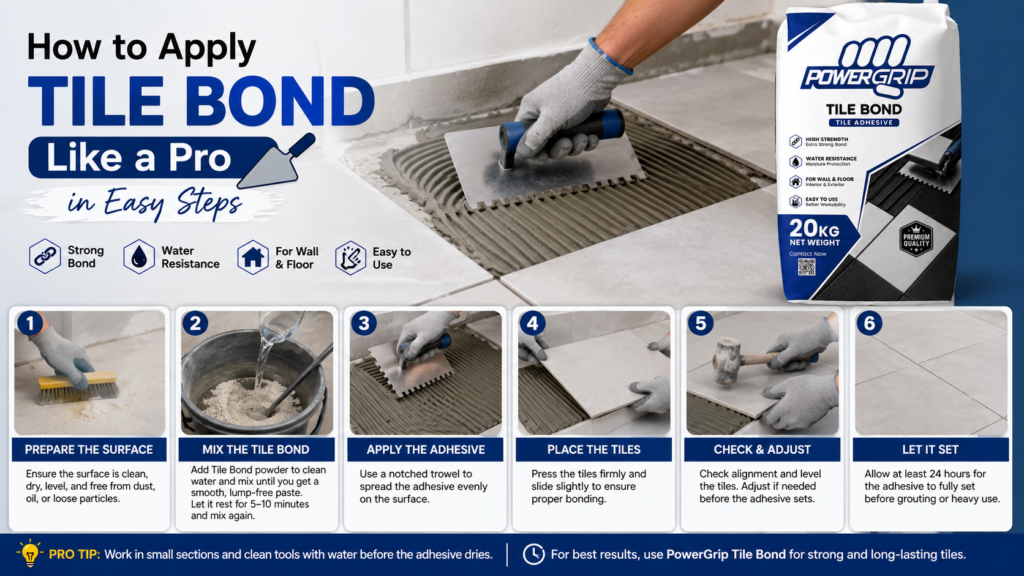
How to apply tile bond? Clean the surface, mix the adhesive according to the manufacturer’s instructions, spread it with a notched trowel, press the tile with a slight twisting motion, use spacers for even joints, and allow the adhesive to cure before grouting.
What Is Tile Bond and Why Is It Better Than Traditional Cement Mortar?
Tile bond, also known as tile adhesive, is a specially formulated adhesive mortar designed to securely fix ceramic, porcelain, vitrified, mosaic, and natural stone tiles to floors and walls.
Unlike ordinary cement mortar, modern tile adhesives contain polymers and performance-enhancing additives that improve flexibility, adhesion, water resistance, and durability.
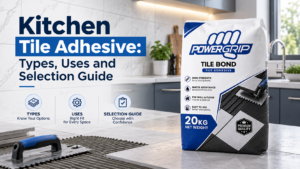
Types of Tile Adhesive
Type | Best For | Main Benefits |
Cement Based Tile Adhesive | Indoor flooring and walls | Affordable and reliable |
Polymer Modified Tile Adhesive | Bathrooms, kitchens, porcelain tiles | High bond strength and flexibility |
Waterproof Tile Adhesive | Wet areas and swimming pools | Moisture resistant |
Flexible Tile Adhesive | Outdoor installations and large format tiles | Handles movement and temperature changes |
Benefits of Using Tile Bond
- Stronger adhesion than cement mortar
- Reduces tile debonding
- Helps prevent hollow tiles
- Suitable for ceramic and porcelain tiles
- Better water resistance
- Easier and faster installation
- Consistent adhesive coverage
- Longer service life
Professional installers almost always recommend polymer-modified adhesive because it performs better in demanding environments where moisture or temperature changes are common.
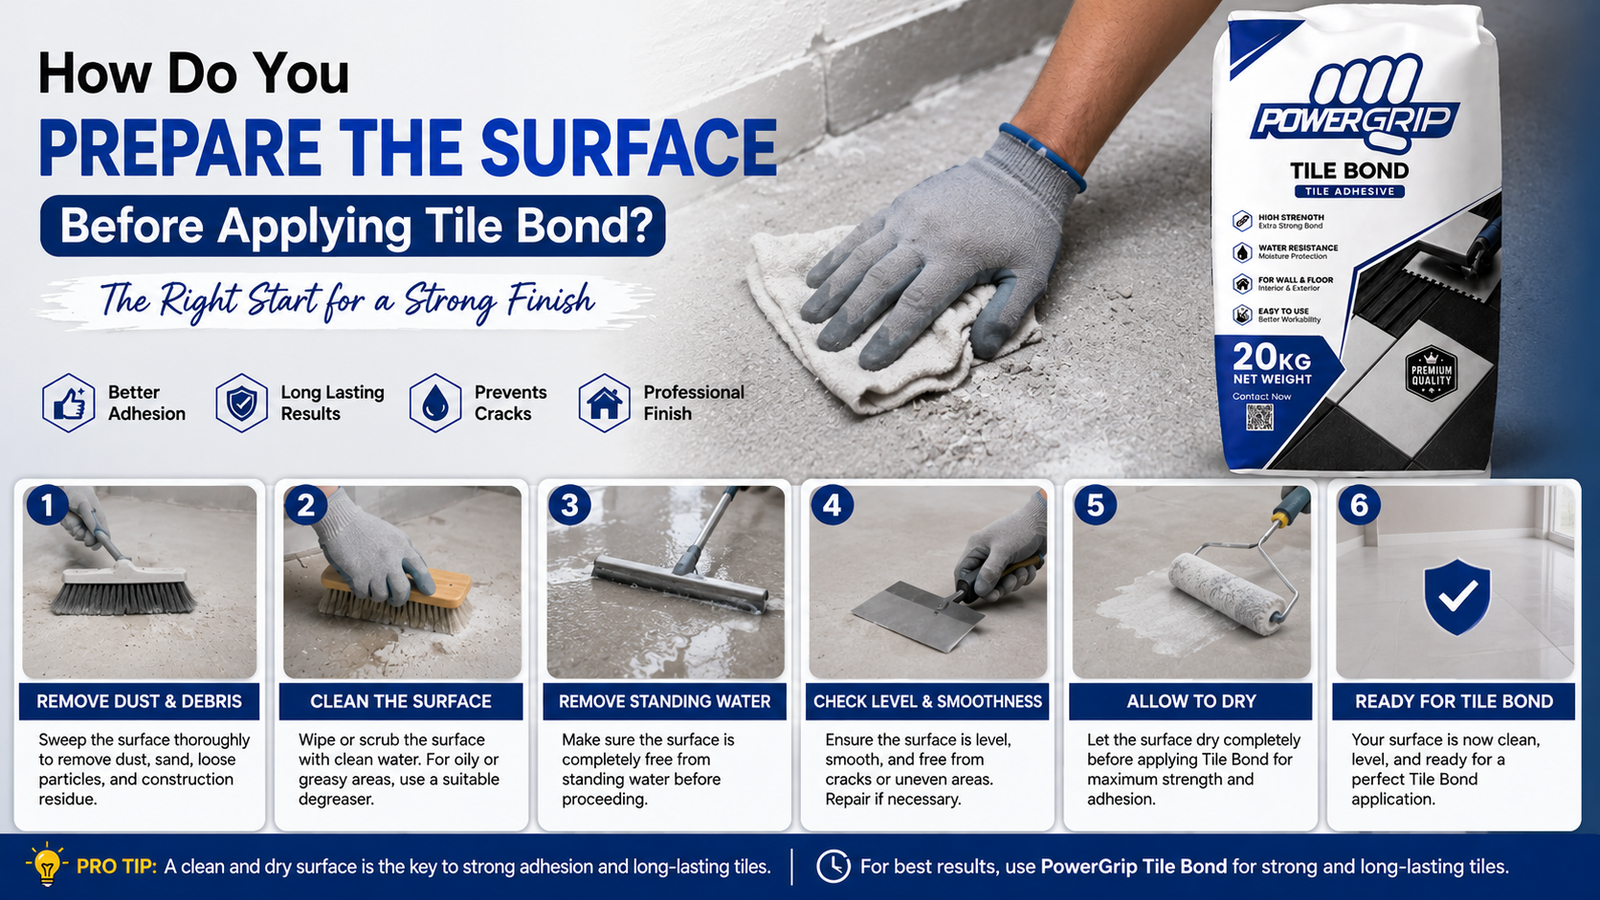
How Do You Prepare the Surface Before Applying Tile Bond?
Surface preparation is one of the most overlooked yet critical steps in successful tile installation.
Even the highest-quality tile adhesive cannot compensate for a weak or dirty substrate.
The Surface Should Be
- Clean
- Dry
- Dust-free
- Structurally sound
- Level
- Free from grease, paint, wax, and loose particles
Suitable substrates include:
- Concrete substrate
- Cement screed
- Cement plaster
- Tile backer boards
- Approved waterproofing membranes
If you’re installing tiles in a bathroom or other wet area, apply a waterproofing membrane before laying tiles.
This extra step protects the structure from moisture damage and improves long-term durability.
Expert Tip
Use a straightedge or spirit level to check the floor or wall.
If the surface has dips or uneven areas greater than 3 mm, level it before tiling.
How Do You Choose the Right Tile Adhesive for Your Project?
Not all tile adhesives are suitable for every application.
Selecting the correct adhesive depends on several factors:
- Tile size
- Tile weight
- Installation area
- Surface material
- Indoor or outdoor use
- Moisture exposure
Recommended Adhesives
Ceramic Tile Installation
A standard cement-based tile adhesive is usually sufficient for ceramic wall and floor tiles installed indoors.
Porcelain Tile Installation
Porcelain tiles absorb very little water, making them more difficult to bond.
A polymer-modified tile adhesive provides the extra adhesion needed for a secure installation.
Large Format Tile Installation
Tiles larger than 600 × 600 mm require:
- Flexible tile adhesive
- Back buttering technique
- Larger notched trowel
- Tile leveling system
Bathroom Tile Installation
Choose a waterproof and flexible adhesive designed for wet environments.
Outdoor Tile Installation
Use an adhesive that can withstand weather changes, moisture, and thermal expansion.
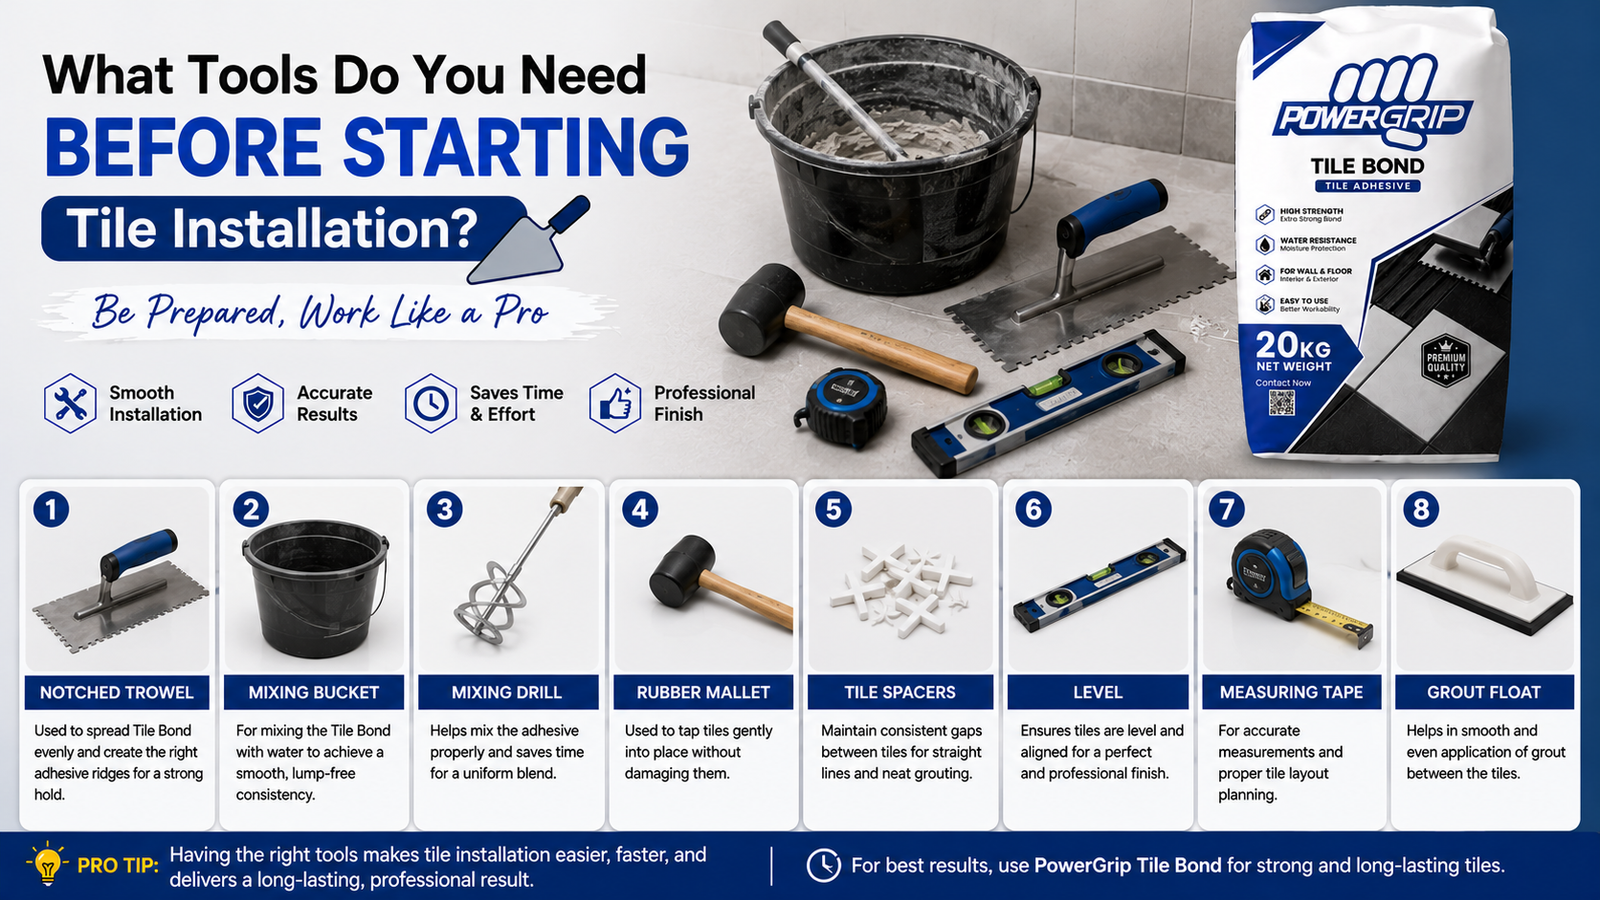
What Tools Do You Need Before Starting Tile Installation?
Having the right equipment makes the installation process faster, cleaner, and more accurate.
Essential Tile Installation Tools
- Mixing bucket
- Mixing paddle
- Electric drill mixer
- Measuring container
- Notched trowel
- Rubber mallet
- Spirit level
- Tile spacers
- Tile leveling clips
- Tile cutter
- Sponge
- Tape measure
- Chalk line
- Margin trowel
- Safety gloves
- Knee pads
Each tool serves a specific purpose. For example, a notched trowel creates uniform adhesive ridges, while a rubber mallet gently seats the tile without causing damage.
How Do You Mix Tile Bond Correctly?
Correct mixing directly affects bond strength, working time, and adhesive performance.
Always follow the manufacturer’s tile bond mixing instructions printed on the packaging.
Typical Tile Adhesive Mixing Ratio
Although the exact ratio varies by brand, most cement-based tile adhesives require approximately:
- 5 to 6 liters of clean water for every 20 kg bag
Never guess the water quantity.
Too much water weakens the adhesive.
Too little water makes spreading difficult and reduces proper tile contact.
Step-by-Step Mixing Process
- Pour clean water into the mixing bucket.
- Gradually add the tile adhesive powder.
- Mix using a mixing paddle attached to a slow-speed drill.
- Continue mixing for about 3–5 minutes until smooth.
- Allow the mixture to rest (slake) for 5–10 minutes.
- Remix for one minute before use.
The finished adhesive should have a creamy, lump-free consistency that holds its shape on the trowel without running.
Avoid These Mixing Mistakes
- Adding water after mixing
- Mixing by hand
- Preparing more adhesive than can be used within its pot life
- Ignoring the manufacturer’s instructions
Properly mixed adhesive spreads easily and creates excellent contact between the tile and substrate.
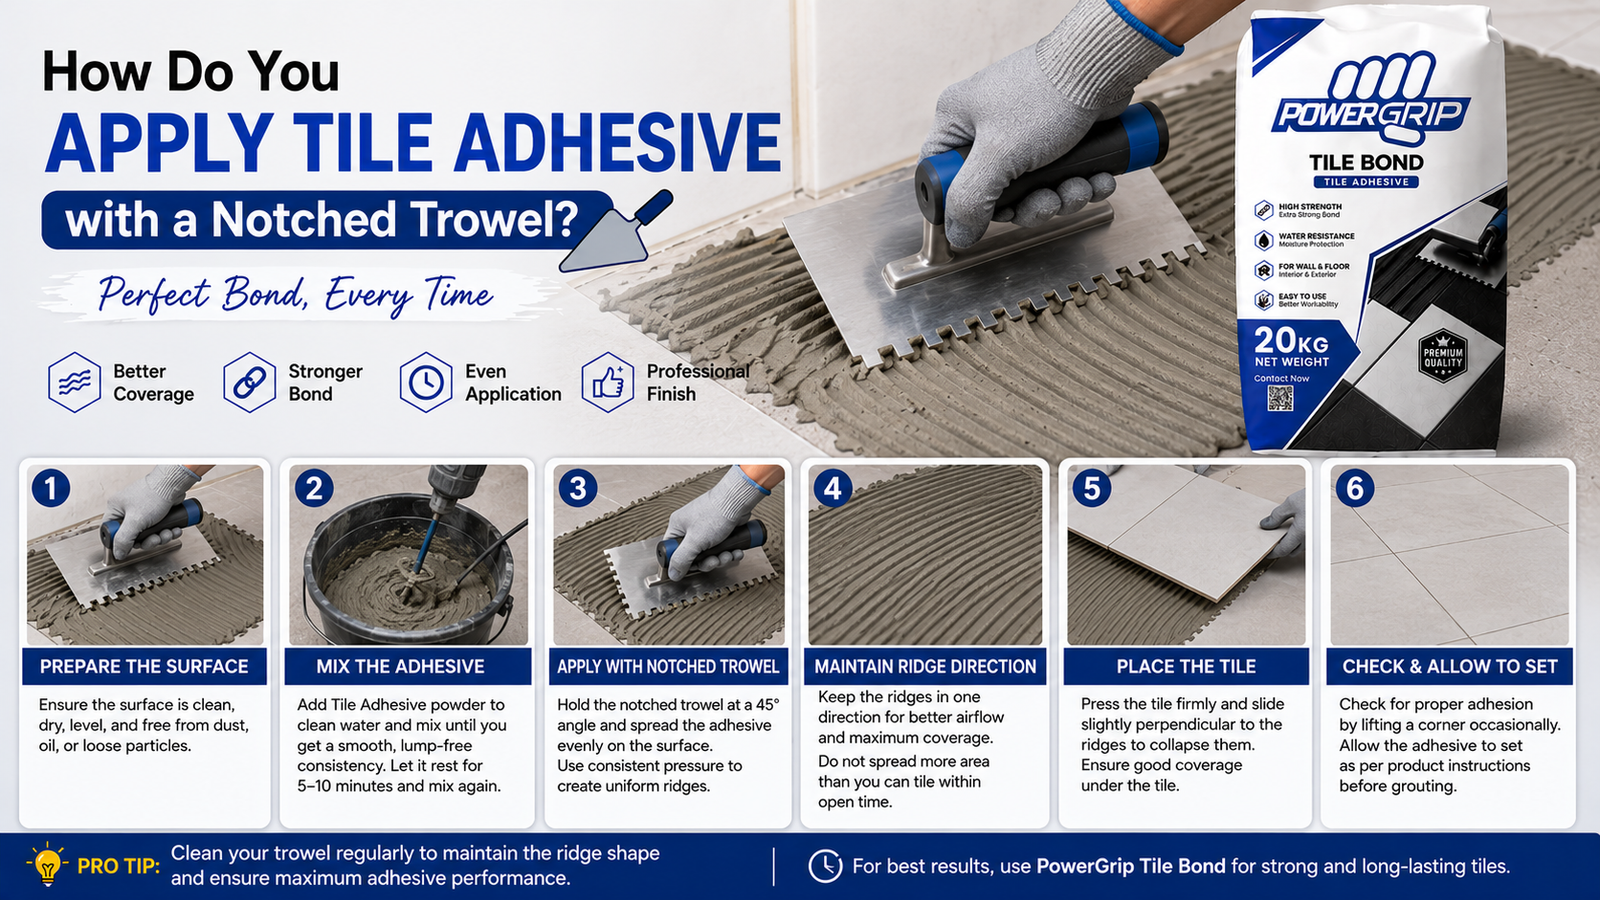
How Do You Apply Tile Adhesive with a Notched Trowel?
Applying adhesive correctly is one of the biggest factors in achieving a durable installation.
Spread only enough adhesive that can be tiled within its open time, which is typically 15–30 minutes depending on the product and weather conditions.
Step-by-Step Tile Adhesive Application
- Scoop adhesive onto the prepared surface.
- Spread a thin contact layer using the flat side of the trowel.
- Hold the notched trowel at approximately a 45-degree angle.
- Comb the adhesive in straight, parallel ridges.
- Avoid circular patterns, as they can trap air beneath the tile.
- Press the tile firmly into place with a slight twisting motion.
- Tap gently with a rubber mallet to ensure full contact.
Choosing the Right Trowel Size
Tile Size | Recommended Notch Size |
Up to 100 × 100 mm | 6 mm |
200 × 200 mm | 8 mm |
300 × 300 mm | 10 mm |
600 × 600 mm and above | 12–15 mm |
Using the correct notch size ensures adequate adhesive coverage and minimizes the risk of hollow tiles or poor bond strength.
How Do You Install Floor Tiles with Tile Bond for Maximum Durability?
Floor tiles are exposed to constant foot traffic, heavy furniture, and daily wear.
A proper installation method ensures the tiles remain firmly bonded for years without cracking or becoming loose.
When installing floor tiles, work in small sections instead of covering the entire floor with adhesive.
This prevents the adhesive from drying before the tiles are placed.
Step-by-Step Floor Tile Installation
- Plan the tile layout before applying adhesive.
- Mark center lines using a chalk line.
- Spread tile adhesive evenly with a notched trowel.
- Place the tile onto the adhesive.
- Press and slightly twist the tile to improve contact.
- Tap gently using a rubber mallet.
- Check alignment with a spirit level.
- Insert tile spacers to maintain consistent grout joints.
- Continue one section at a time.
Pro Tip
Frequently lift one installed tile to inspect adhesive transfer. Ideally, at least 90–95% coverage is recommended for indoor flooring, while 95–100% coverage is ideal for wet areas and outdoor installations.
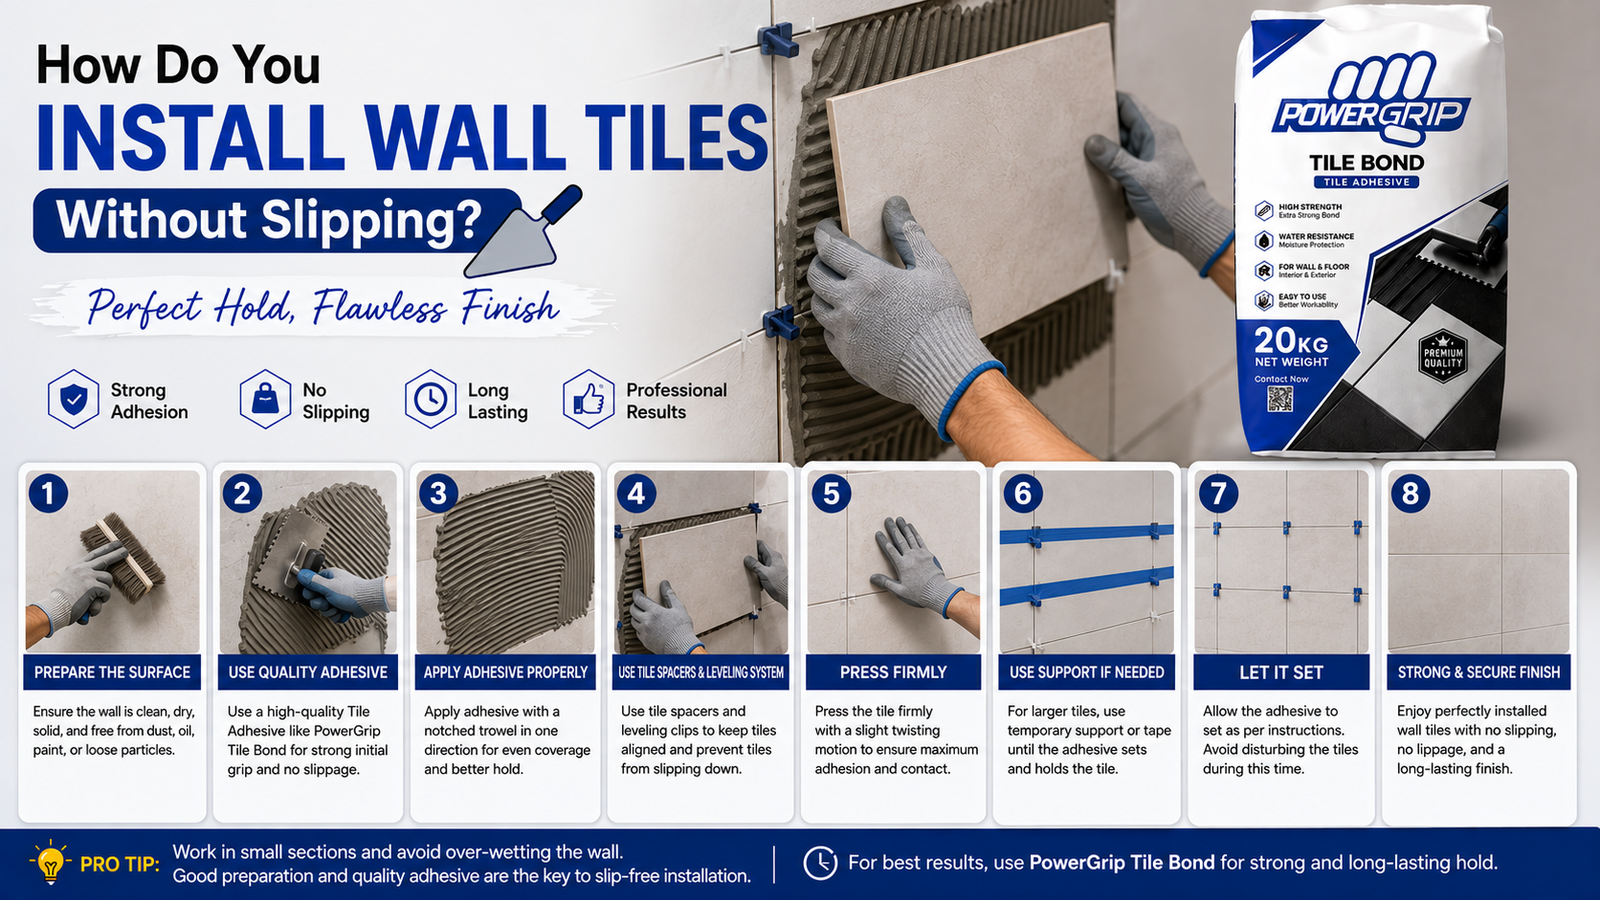
How Do You Install Wall Tiles Without Slipping?
Wall tile installation requires extra care because gravity can cause tiles to slide before the adhesive sets.
Professional installers usually begin from the second row instead of the floor.
A temporary support batten keeps the first rows perfectly straight until the adhesive hardens.
Best Practices for Wall Tile Installation
- Ensure the wall is completely clean and dry.
- Use a polymer-modified tile adhesive for a stronger grip.
- Apply adhesive in small areas.
- Comb adhesive in one direction.
- Press each tile firmly.
- Insert tile spacers immediately.
- Check alignment every few rows with a spirit level.
For heavy porcelain or large-format wall tiles, use the back buttering technique for improved adhesion.
What Is Back Buttering and When Should You Use It?
Back buttering means applying a thin layer of tile adhesive to the back of the tile before placing it onto the adhesive bed.
This simple technique significantly increases bond strength and minimizes air pockets.
Back Buttering Is Recommended For:
- Porcelain tile installation
- Large format tiles
- Outdoor tile installation
- Natural stone
- Uneven tile backs
- High-traffic commercial flooring
Benefits
- Improves adhesive coverage
- Prevents hollow tiles
- Increases tile bond strength
- Reduces tile debonding
- Enhances long-term durability
For tiles larger than 600 × 600 mm, most professionals recommend combining back buttering with the adhesive already spread on the substrate.
Why Are Tile Spacers and Tile Leveling Systems Important?
Many DIY installers underestimate the value of tile spacers and leveling systems.
However, these tools play a crucial role in achieving a professional finish.
Tile Spacers
Tile spacers help maintain equal grout joints throughout the installation.
Common spacer sizes include:
- 2 mm
- 3 mm
- 5 mm
The correct size depends on the tile type and design preference.
Tile Leveling System
A tile leveling system uses clips and wedges to keep adjacent tiles at the same height while the adhesive cures.
Benefits
- Prevents tile lippage
- Produces a flat surface
- Speeds up installation
- Improves appearance
- Reduces costly corrections
This system is especially useful for large-format porcelain tiles.
How Much Tile Adhesive Do You Need?
One of the most common questions during tile installation is how much adhesive is required.
The answer depends on:
- Tile size
- Surface condition
- Trowel notch size
- Adhesive type
- Back buttering requirement
Average Tile Adhesive Coverage
Notched Trowel Size | Approximate Coverage (20 kg Bag) |
6 mm | 6–7 m² |
8 mm | 4–5 m² |
10 mm | 3–4 m² |
12 mm | 2.5–3 m² |
Always purchase 10–15% extra adhesive to account for waste, uneven surfaces, and tile cuts.
How Thick Should Tile Bond Be?
For most tile installations, the adhesive bed should measure between 3 mm and 10 mm after the tile is pressed into place.
The required thickness depends on the tile size and substrate condition.
General Guidelines
- Small ceramic tiles: 3–4 mm
- Medium floor tiles: 5–6 mm
- Large-format porcelain tiles: 8–10 mm
Applying excessively thick adhesive can increase shrinkage, extend curing time, and weaken the bond.
How Long Does Tile Bond Take to Dry and Cure?
Many people confuse drying time with curing time, but they are different.
Stage | Typical Time |
Working Time (Open Time) | 15–30 minutes |
Pot Life | 2–4 hours |
Light Foot Traffic | 24 hours |
Grouting | 24–48 hours |
Full Curing Time | 7–28 days |
Factors That Affect Drying
- Temperature
- Humidity
- Tile size
- Adhesive thickness
- Ventilation
- Substrate type
Avoid walking on newly installed tiles until the manufacturer’s recommended drying time has passed.
When Should You Apply Grout After Installing Tiles?
Grouting should only begin after the tile adhesive has dried sufficiently.
Most manufacturers recommend waiting 24 to 48 hours, although this can vary depending on environmental conditions and adhesive type.
Grouting Steps
- Remove tile spacers.
- Clean grout joints.
- Mix grout according to instructions.
- Apply grout diagonally with a rubber float.
- Fill every joint completely.
- Remove excess grout.
- Clean tiles with a damp sponge.
- Polish the surface after the grout haze appears.
Properly filled grout joints help prevent water penetration and improve the overall appearance of the tiled surface.
What Are the Most Common Tile Adhesive Mistakes?
Even experienced installers can make mistakes that reduce tile lifespan.
Mistakes to Avoid
- Skipping surface preparation
- Mixing adhesive with too much water
- Applying adhesive over dusty surfaces
- Using expired tile adhesive
- Covering too large an area before laying tiles
- Ignoring the adhesive’s open time
- Using the wrong notched trowel size
- Failing to use tile spacers
- Not checking tile alignment
- Walking on tiles too early
- Skipping back buttering for large-format tiles
- Leaving air pockets beneath tiles
- Ignoring expansion joints
These mistakes often lead to:
- Hollow tiles
- Cracked grout
- Loose tiles
- Water seepage
- Tile debonding
- Uneven flooring
What Are the Best Professional Tips for Long-Lasting Tile Installation?
Professional tile installers follow proven techniques that improve durability and appearance.
Expert Recommendations
- Always use clean water for mixing adhesive.
- Measure the water accurately instead of guessing.
- Mix adhesive with a mechanical mixing paddle.
- Work within the adhesive’s open time and pot life.
- Comb adhesive in one direction.
- Use back buttering for large porcelain tiles.
- Install expansion joints in large tiled areas to accommodate movement.
- Regularly check tile levels with a spirit level.
- Keep grout joints clean throughout installation.
- Protect freshly tiled surfaces from rain, direct sunlight, and heavy traffic during curing.
- Choose a waterproof tile adhesive for bathrooms, kitchens, balconies, and other moisture-prone areas.
- Select a flexible tile adhesive for outdoor projects where temperature changes can affect the substrate.
By following these professional practices, you can achieve a durable, attractive tile installation that resists cracking, debonding, and moisture damage for many years.
What Is the Difference Between Tile Bond and Traditional Cement Mortar?
Many homeowners still compare tile adhesive with traditional cement mortar when planning a tiling project.
While both are used to install tiles, they differ significantly in performance, ease of application, and long-term durability.
Feature | Tile Bond (Tile Adhesive) | Traditional Cement Mortar |
Bond Strength | Excellent | Moderate |
Ease of Application | Easy and consistent | Requires more skill |
Suitable for Porcelain Tiles | ✔ Yes | ✘ Not Recommended |
Suitable for Large Format Tiles | ✔ Yes | Limited |
Adhesive Thickness | Thin-set application | Thick bed application |
Water Resistance | High (with waterproof variants) | Lower |
Flexibility | Excellent | Poor |
Drying Consistency | Uniform | Can shrink and crack |
Material Waste | Minimal | Higher |
Long-Term Performance | Excellent | Average |
Which One Should You Choose?
For modern residential and commercial projects, polymer-modified tile adhesive is generally the preferred choice.
It provides superior bond strength, better flexibility, excellent moisture resistance, and reliable performance on both wall tiles and floor tiles.
Traditional cement mortar may still be used for specific heavy-duty applications, but tile adhesive remains the industry standard for most installations.
What Are the Best Practices for a Professional Tile Installation?
If you want your tiled surface to last for decades, follow these proven professional practices:
Before Installation
- Inspect the concrete substrate or cement screed for cracks and uneven areas.
- Complete all surface preparation before mixing adhesive.
- Apply a waterproofing membrane in wet areas such as bathrooms and balconies.
- Dry-lay the tiles first to confirm the tile pattern and layout.
During Installation
- Use the correct tile adhesive consistency by following the manufacturer’s mixing instructions.
- Spread adhesive evenly using a notched trowel.
- Use back buttering for porcelain tiles and large format tiles.
- Install tile spacers and tile leveling clips for uniform joints and a flat finish.
- Check alignment frequently with a spirit level.
- Leave expansion joints in large tiled areas to accommodate movement.
After Installation
- Allow the adhesive to cure fully before exposing the surface to heavy loads.
- Complete grouting after tile installation only within the recommended time frame.
- Clean grout haze promptly using a damp sponge.
- Avoid harsh cleaning chemicals during the initial curing period.
Following these steps helps prevent hollow tiles, reduces the risk of tile debonding, and ensures a professional-quality finish.
Frequently Asked Questions
How do you apply tile bond correctly?
Start by preparing a clean and level surface. Mix the tile adhesive according to the manufacturer’s instructions, spread it evenly with a notched trowel, comb it into straight ridges, place the tile with a slight twisting motion, and use tile spacers to maintain even grout joints.
How thick should tile bond be?
For most installations, the adhesive bed should be between 3 mm and 10 mm after the tile is pressed into place.
The exact thickness depends on the tile size, substrate condition, and the notched trowel being used.
How long should tile bond dry before grouting?
Most tile adhesives require 24 to 48 hours before grouting. Cooler temperatures, high humidity, and thicker adhesive layers may increase drying time, so always follow the manufacturer’s recommendations.
Can tile bond be applied directly on concrete?
Yes. Tile bond can be applied directly to a properly prepared concrete substrate. The surface should be clean, dry, structurally sound, and free from dust, oil, grease, or loose particles.
Any cracks or uneven areas should be repaired before installation.
Can tile bond be used for porcelain and wall tiles?
Yes. Modern polymer-modified tile adhesives are specifically designed for porcelain tiles, ceramic tiles, wall cladding, and flooring installation.
For large-format porcelain tiles, back buttering is recommended to achieve maximum adhesive coverage and bond strength.
Conclusion
Learning how to apply tile bond correctly is one of the most important steps in achieving a durable, attractive, and long-lasting tile installation. From selecting the right cement-based or polymer-modified tile adhesive to preparing the surface, mixing the adhesive properly, using the correct notched trowel, and allowing adequate curing time, every stage contributes to the overall strength and appearance of the finished project.
Whether you’re planning a DIY tile installation or working on a professional construction project, following the techniques outlined in this guide will help you avoid common installation mistakes, improve tile bond strength, and create a flawless finish for ceramic, porcelain, and large-format tiles.
Take your time, use quality materials, and follow manufacturer recommendations.
A properly installed tile surface not only looks beautiful but also delivers reliable performance for many years.